1111

Ad beeBaz

Google Algorithms: Panda, Penguin and Hummingbird

Google Algorithm
It has been so long we've not talked about search engine optimization and the time arrives now. So, we're going to pick up the interesting topic - Google Algorithms : Panda, Penguin and Hummingbird. In the past, these were the terrible animals for people but now Google have made them terrible for webmasters. Every webmaster know them very well if you don't get them known before you get hit from them and almost everyone don't want to get them on their way. Yeah! There are also some webmasters (specially called SEO Analysts) who love to fight with them.

Let's come to the real fact now. Google Panda, Penguin and Hummingbird are the algorithms that Google uses in its big search engine. In order to display search results of the desired keyword, Google uses some factors but usually after the gap of 2 3 months Google update these algorithms and they just make changes in the whole search results. Simply, some websites rank lower and some higher after the update. These Google algorithms uses many factors, points, rules to penalize any website or to gift the high rank to them.

I'm writing this article specially for newbies who don't have heard about these Google algorithms before. Commonly, I've described about these algorithms that what they're and what they do but let's dig more about these algorithms one by one.

1. Google Panda

Those were the days when the development of websites was increasing more and more but mostly more than half of them were just duplicating other well published websites. People were copying content from others site instead of creating their own original and high quality content. Some were even re-writing the content by using tools. It was growing more and more even more than spam, this all was just happening to make money online but at last, it was all illegal and original owners had to took action against copyright law but how many complaints do they report, it was a very huge number. Than suddenly in February 2011, Google made a blast and introduces Google Panda. Panda is aimed to take down the sites that has low quality content, duplicate content or re-written content and rank high the original owner. Many sites were affect on the first release and ruined all the crappy sites. If you use to copy content from other sites than remember, you'll dead by Panda soon.

2. Google Penguin

After Panda, The number of duplicating others content by decreasing rapidly but on other side people had started doing over-optimization. Penguin kick the sites away from Google search results who violate Google webmaster guidelines or make use of black hat techniques to rank higher in SERP. This Google algorithm's first release was introduced on 24 April, 2012 and Penguin 2.1 was the most recent update made on 4 Oct 2013. This recent update had affected only 1% searches but previous ones had made big changes. If you do over optimization like keyword stuffing, keyword density out of range, anchor text link building spam, link spam than you will probably get hit from Penguin. Avoid black hat techniques to rank high in SERP and don't violate Google webmaster guidelines to be safe with Google Penguin.

3. Google Hummingbird

When there were Panda and Penguin, many spammers gave up because their all work was going waste and on other hand, Google wanted to grow more and more. Another Google Algorithm called Hummingbird was released on September 27, 2013. Actually, Google revealed this algorithm on that date but Google had started using it back from August 2013. The gurus say that this algorithm is used to bring better and more natural search results. This algorithm improved the way Google showed the search results. Better search results as accurate results, graph results like if I search for "Whats time now in USA" than it directly displays the time in search results page instead of going into the next page. Hummingbird is just all about improving the search results but it took down many sites and also raised the high quality sites.

Now, What?

Now, You just be a good guy and don't mess with these Google algorithms otherwise you can also be their next enemy. Take the guides some experts to be best friends with these algorithms. Being friend with them will let you touch more and more success. That was all for today and hope you enjoyed reading it out. Make a share of this article with your friends. Cheers!

The Importance Of Automation Tools In SEO

SEO
In recent years, the game of SEO (Search engine optimization) has changed dramatically. There was a time when you just keyword stuff your content and voila!, you're on top of Google but those  days are ancient history now.

Thanks to ferocious blackhat SEO spammer, Google had to released quite a few big updates known as Panda, Penguin and the latest one, Hummingbird, This was done in order to cool them down (teach them a lesson).

People were using a lot of way to exploit Google's algorithm so they can climb the SERPs. Ranking on Google before was as easy as 1,2,3 and I do mean literally.
Publish a decent content on your blog
do some tiered backlink or just plain spam
that's it
but now things has gone really complicated, strategies like link wheel, link pyramid (almost same thing), extreme multi tiered backlinking campaigns and other stuff like these are being used to manipulate big G.

Now back in those and these day, one thing is really common, you know what?. People then and people now rely heavily SEO Automation tool, It has become such a common practice that there's a misconception between newbies that they can't rank in Google if they don't have the right tools.

Are Tools Really Important In SEO

Yes, they're quite important since they help us do our work more efficiently and more better, as the definition goes.

A machine doesn't get tired nor does it get bored of doing one task over and over and over again whereas a human does.

Now the same thing goes with softwares as well. you can estimate the importance of SEO tools by comparing them to the man's first and most useful invention, Tire. Yes, SEO automation tools enjoy the status of tires in SEO industry :D.

Ever since softwares like  Xrumer and Scrapebox started coming, they changed the face of SEO as we know it, what used to take hours upon hours, started happening in mere minutes so which makes them pretty useful.

But here comes the most wanted question which is often asked amongst the newbies.

Can SEO Be Done Properly Without All These Fancy Tools

The answer is NO.

I'm just messing with you guys, offcourse it can be done without tools, infact, that's the right way to do it :P.

No doubt that tools like GSA SER, Scrapebox and Xrumer makes our work a hell lot easier but they still lack one thing, Intelligence. Google has become extremely intelligent and so as its algorithm, highly complicated link structures are made to make backlinks look like natural because if they don't look "natural", you know what's coming your way?. Penalization!.

Combining Tools With Manual Link Building

Now that's where the magic happens. I'm pretty sure some of guys are skeptical about it but here me out first.

as you guys know, I'm a big fan of SEO automation softwares like GSA SER, Scrapebox, Xrumer and a few other like these but I also don't use these tool for my 1st tier backlinks, never ever. I've always said and still saying that these automation tools are perfect for 2nd tier, 3rd tier and even 4th tier but they shouldn't be used in 1st tier backlinking because it's just not right.

A lot People says that these tools didn't worked the way they thought it would, what these people don't know is that they're not some SEO magic wand or blackmagic, like any other tool if you don't know how to use them, how the heck do you suppose them to perform?.

Another mistake which is too often done by newbies is that they used content spun from Article spinners like TBS and Spinner chief on 1st tier. I think by now they should know that Google's ain't their bit** and even if it is (It is :D) then they're not its owner.

Treat Google with respect and climb the SERPs.

About The Guest Author

My name is Irfan Saleem, 17 year old and I’m a Internet marketer from Pakistan. I share my latest experiments, case studies and random things on my blog.

Top 10 Best WordPress SEO Plugins

WordPress SEO Plugins
WordPress has been one of the most popular and best content management system that people use to build their own web. After making websites, it's also a great platform for blogging. Mostly, every blogger uses WordPress to manage their own self hosted blogs. WordPress is on the no.1 because it has great and amazing helpful features. A user can do any kind of tweaks in WordPress as he wants but sometimes it might require self made coding.

Well, WordPress is also perfect in SEO. By default, there are not any SEO features in WordPress but many great WordPress SEO Plugins are available that make the WordPress SEO easier. So, Today we're going to discuss about some top best WordPress SEO Plugins.

Why To Use WordPress SEO Plugins?

If you're completely new about SEO and also specially with WordPress than you must have a read on this passage. SEO stands for search engine optimization and every webmaster usually optimize their webs for search engines in order to get organic search traffic. If you want to drive high traffic through search engines than you need to optimize you web for search engines while plugins help us to optimize our blog. SEO can also be done manually but in order to save time and do work properly WordPress SEO Plugins are important to use.

1. WordPress SEO By Yoast

WordPress SEO By Yoast
This is one of the most popular and best WordPress SEO Plugin that is being used by almost every blogger. This comes with both free and premium versions. WordPress SEO by Yoast let you create web pages and blog posts search engine friendly and also optimize them to rank better in SERP. You can call this plugin all rounder because this plugin manages every single thing of SEO. The most needed features that you'll get with this plugin are XML sitemaps, page analysis, Meta and Link elements, permalink, breadcrumbs, RSS optimization, Google rich snippets, Social Integration and many more. Other than this, they're many free guides with video tutorials are available on the web about the proper usage of this plugin.

2. All in One SEO Pack

All in One SEO Pack
Another most popular WordPress SEO plugin that has got more than 20 million downloads is known as "All in One SEO Pack". Some people refer for WordPress SEO By Yoast and some also refer for All in One SEO Pack. These two plugins are top tending plugins. As its name proves, This plugin has every feature that any SEO expert will require. Its developers say that this plugin automatically optimize your WordPress website for search engines such as Google, Bing and Yahoo. Currently, It has 2.1.3 most recent updated version which have some features including XML sitemaps, Google Analytics, Advanced canonical URLs, Fine tune page navigational links, Built in API, automatically optimize titles and meta tags and many more.

3. SEOPressor

SEOPressor
This is the third best WordPress SEO Plugin that is paid not free but also has some different features from above mentioned plugins. This plugin is best to do on-page SEO of your WordPress site this plugins looks like a manager which commands you to properly optimize your WordPress site for search engines. It gives real-time recommendation while writing articles about keyword density, keyword targeting, meta tags, image optimization, over optimization and also scores the post after the analysis. Try to get highest score while using this plugin in order to rank better in search engines. It also gives some keyword suggestion that will help you to target highly searched keywords and gain the best traffic.

4. RB Internal Links

Internal linking is important factor these days as it helps to call crawler to crawl your web more and more times. Internal linking also helps you to target keywords easily and rank better in SERP. RB Internal Links seems good and also popular WordPress SEO plugin that helps you to do internal linking of your WordPress site easily. Unfortunately, This plugin has not been updated for 2 years but it may still work cool. This plugin doesn't make use of URLs or Permalinks to do internal linking but it users post and page IDs to do internal linking that is a great thing actually. If the URL gets changed in a sudden time than it wont affects on internal links because that plugin uses IDs and saves from 404 error pages.

5. Google XML Sitemaps

Google XML Sitemaps
Having a great XML sitemaps that may fetch new posts and ping Google for index is important for every site or blog. WordPress plugins lab provides you an exclusive plugin that creates the XML sitemaps of your WordPress site specially for Google. If Google is gonna accept such sitemaps that other search engines will probably do it. This plugin has 3.4 most recent version that is absolutely free to download. Google XML sitemaps share hands with you to create easily create XML sitemaps in which posts, pages, categories and tags pages can be included and you'll have full control to moderate them. 

6. SEO Friendly Images

SEO Friendly Images
Images are also an important content on our sites as they help us to improve user interface, beautify blog and also we use them as "Content" purpose. Well, search engines are also always interested in great images that they find while crawling the webpages. You might have seen image search engines and you know from where do they get those images?  Those images are also taken from webpages like our sites that use images. Well, the images in our sites can also be optimized for search engines to rank better in image search. SEO Friendly Images lets you optimize your images with alt and title tags automatically. Actually, It may take image name as alt and title tag.

7. Scribe For WordPress

Scribe For WordPress
Scribe for WordPress is another most powerful WordPress SEO Plugin that comes with premium version only. This plugin gives you some powerful content marketing tools that helps you to create ever killer content directly from your WordPress post editor. This plugin is great for business and as well as for personal small blogs also. The content that is created with the help of this plugin definitely goes viral and helps your to blog to increase Page Rank, Domain Authority, Page Authority and some other important SEO factors. Means it also makes the content that is suitable for search engines completely. After SEO this plugin is also useful for social promotion purpose as there are also some useful tools that helps you to easily drive traffic through social media networking.

8. SEO Rank Reporter

SEO Rank Reporter
Keeping track of search engine rankings is not much important as sometimes low rank can loose energy to work harder but sometimes high rank also boosts our energy to work even more harder. Well, The thing that I do is just concentrate on creating more and more content only that actually helps to drive every kind of traffic. If you're interested to have track of your search engine rankings than this is powerful plugin for you that will report you the ranking reports. This plugin displays data in graph and also have some more functionality. It gives you the report of every 3 days. Its free and most recent version is 2.2

9. Simple 301 Redirects

Have to redirect a big list of 404 pages or broken URLs? This plugin made it easy for everyone who doesn't know how to edit and redirect URLs manually through .htaccess file. Its too tough to do 301 redirect through .htaccess and also needs to have much knowledge about coding. But who cares if you've simple 301 redirects plugin. You can easily redirect high number of URLs with 301 type.

10. Googlyzer

Do you use Google Analytics to track visitors analysis? No doubt, Google Analytics is best tool for counting visitors but do you get fed up of going out again and again from your WordPress dashboard to check reports? Googlyzer made it easy to check Google analytics reports directly from your WordPress dashboard. This plugin helps you to integrate Google Analytics data and display it in your dashboard. You can install tracking code, check multiple graph reports and also create reporting widgets with this plugin.

What's Next?

So, SEO Experts! These were some best WordPress SEO Plugins that you can use to rank high in search engines, track things and can do more with SEO. However, There are also more interesting plugins that you can get in plugins store. Hope the WordPress users may have liked this article as it is specially for them this time. Lets make the discussion about these plugins by commenting and also them with your friends. Happy WordPress Optimization!

Top 5 Free Best Backlink Checker Tools

Best Backlink Checker
Being a blogger and webmaster, It's important to learn the basics of search engine optimization. We've discussed many things about SEO for newbies and also for pros. If you're known a bit to SEO then you might have heard about backlinks. We've also written several posts about backlinks which are how to increase backlinks, nofollow and dofollow links, get high PR backlinks and many more. Well, creating backlinks is just another thing which we should do regularly in order to good rank in SERP. But sometimes, we're interested to know that how much backlinks we've made till now. There are many ways for this to check the backlinks of our blog but in this post, I'm going to share some best backlink checker tools which will help you to analyze your backlinks easily.
Recommended : Top 20 Best Free SEO Tools For Bloggers

1. Ahrefs

Ahrefs has the largest index of live backlinks which are updated after every 15 minutes, it's quite simple to use for any beginner yet it provide deep enough statistics that are needed and trusted by gurus, it provide stats such as, inbound and internal backlinks, anchor text cloud,  incoming links TLD chart etc. Ahrefs have paid plans starting from 79$ monthly to 499$ monthly and free version of Ahrefs can allow you to see up to 10 backlinks per request (you can see the exact number but details will only be shown of 10 first backlinks).

2. Majestic SEO

Majestic SEO is one of the oldest backlink checker tool, although it can be a little hard for any newbie to get hang of it metric showing interface but once you do you won't regret it, it can show 90 days accurate backlink history of any domain and some usual basic features such as anchor text cloud, backlink attribute chart. MajesticSEO plans starts from 49.99$ monthly to whopping 1599.96$ monthly, although free version won't allow you to see detailed reports but still there's a lot you can do with it.

3. Open Site Explorer

Open Site Explorer is owned by Moz (formally known as SEOMOZ ), it's one of the best new tool out there, it shows some of the newest metrics like domain authority and page authority, and the basic usual info as well, you can compare sites as well head to head. Open Site Explorer packages starts from 99$ per month to 599$ per month, and you can get free 30 days trial of its 99$ per month stand package without any commitment.

4. Backlink Watch

Backlink watch is a free backlink explorer which is powered by Ahrefs but the difference between it and ahrefs is that in backlinkwatch you can see every backlink linking to your domain without paying a dime although the report isn't as fancy as it's in Ahrefs but it's free and accurate.

5. Link Diagnosis

Link diagnosis is powered  by Iacquire, it's a free tool just like Backlinkwatch, there are several settings to play with before requesting report for your domain like you can change the engine, report type etc.
If you have any questions, feedback or suggestion do let us know we'll be more than happy to help you.

About The Guest Author

Irfan Saleem is one of the co-founder of Netguidelines (Internet Marketing Blog), he got loads of experience in SEO industry and social media marketing, he's a fun guy and explains difficult thing in a fun and understandable way so anyone can learn and take benefit from it.

How To Do Keyword Research?

Keyword Research
It is important for every blogger to do search engine optimization in order to drive organic and best traffic towards the blog. If I describe the whole process of SEO in a single sentence then it will be like this. "Understand the process of indexing and ranking webpages by search engines and optimize your blog friendly for that whole process". In case there are many things that we do with SEO and every beginner blogger needs to understand it step by step. Today, we're going to learn the most popular thing in search engine optimization on which every webmaster should work with it for their websites and blogs. In this post, we're going to learn that how to do keyword research and it is specially for beginners.

What is Keyword Research?

Actually our main topic is how to do keyword research but newbies must know about keyword research to perform better in tutorial. Keyword Research is one of the most popular thing in search engine optimization which webmasters do to rank their websites and blogs better in search engine result pages. Basically, "Keyword" is a phrase which people write in search engines to search anything. For example if I want to search that how can we learn web designing online then I will write something like this in search engine "Learn web design online" so here "Learn web design online" is considered as keyword. And about research, it is simple that doing research for some popular and trending keywords is known as Keyword Research.

Why To Do Keyword Research?

Basically, It's important to do keyword research and target some keywords which will help you to drive traffic to your blog through search engines. While doing keyword research, you'll be able to know that which topics are trending these days, what number of searches are happening monthly in search engines across the world. And you can target some keywords which may have high number of searches monthly. Once you've done keyword research, targeted any keyword and got a better rank in that keyword than you're free to get tons of traffic.

How To Do Keyword Research?

So now it's time to learn how to do keyword research. There are many tools and softwares available on the internet which will help us to do keyword research for any particular search engines. But everyone knows, Google is one of the best and most used search engine and we should also try to get better ranking in Google search. For us, Google has provided a tool "Keyword Planner" to do keyword research and we're also making use of it. Let's get started now.
First of all, you've to act like you want to search anything in search engines and select the topic on which you actually want to do keyword research. Then create a list of some keywords and use the Google Keyword Planner to know which keyword is most searched. Let's know each keyword's number of monthly searches.
  • Go To Google Keyword Planner
  • Login With Your Google Account.
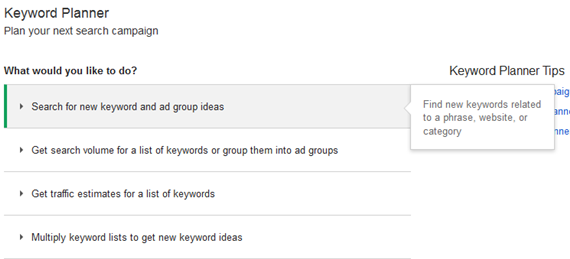
  • Click on "Search For New Keyword and Ad Group Ideas".
  •  Now a long section which appear which will help us to do keyword research.
  • In the first box, type your keyword.
  • You can select your niche in "Your product category"
  • And in Targeting, you can also setup the locations, languages and much more.
  • At last, Click "Get Ideas".
  • When the result comes, click "Keyword Ideas" tab and something will appear like below.
  • I searched the keyword "Learn web design online" and you can see that this keyword is having 390 monthly searches currently.
  • Below you can also get the relevant keyword ideas given by the Google Keyword Planner which will help you to do better keyword research.
  • Now, note down the monthly searches and also in which competition it is.

Which Keyword Should You Target Now?

When you've noted the monthly searches of some keywords and also their competition then you may face this problem that which keyword should you target. Basically, We should target that keyword which may have high number of monthly searches but competition also matters a lot. You also need to look at your blog. If you try to target high competition keyword and your blog is new with not much population and other rankings then you may fail in targeting that keyword. Because many other popular sites may also be working at those keywords. Yeah! If your blog is much popular and have good Page Rank, Alexa Ranking, Backlinks, Domain Authority and many other ranks then you can target those high keywords otherwise going for medium or low competition keyword is better. Got it?

Final Words

So friends, that was all about the tutorial on how to do keyword research and I don't think keyword research is any difficult task. Just for newbies, we tried to make the post descriptive as more as we can. If you've any question, suggestion, views and want to say something then please comment below. If you got helped with this post then please share this post with friends so that others should also learn proper SEO. Take a lot of care till the next post.

Amazing Tips To Increase Google Page Rank

Increase Google Page Rank
On 6th December, Google suddenly shocked us by releasing Google Page Rank Update after the 10 months. In this update, many bloggers and webmaster got increase in their page rank and they got a different page rank of their blogs. In other side, there are also some bloggers whose page rank is decreased in this update and some of them not even done movement and they are as they were before the update. There are many benefits of having high page rank such as a quick index in Google, better position in Google SERP, more guest post submissions and many more. In this post, I'm going to share some amazing tips which will help you Increase Google Page Rank. Let's start studying these amazing tips.
You May Like To Read : Benefits Of Blogging

1. Create Unique Shareable Content

As I've been always saying that "Content Matters Alot" here in the page rank situation content also matters now. You should create unique content on your blog which should not be seen by anyone on the internet. Unique content that should be loved by Google and you can get Google love your blog content by following Google's better search engine optimization guides. Unique content that can help you to get higher traffic from search engines, getting good position in Google SERP, people will share it on social networks by which you're getting backlinks, increase google page rank and many more. If the content is best then people will love to link-back it to their blogs, social networking and bookmarking profiles which will help you to increase page rank.

2. Get High Page Rank and Quality Backlinks

If you want to increase your Google page rank then you need to build quality and high page rank backlinks for your blog. A high page rank backlink can be equal to 50 backlinks from 0 or N/A websites. Another thing you've to note in your mind is that the webpage which is having backlinks of your blog should be relevant and have related topic with your blog. In other words, you can say that you've to get backlinks from such webpages which should have same niche of your blog. Otherwise instead of increasing page rank, your blog traffic can go down because that's irrelevant backlinks. Your blog will be penalized in the Google Penguin update if you've irrelevant backlinks. A few days ago, I'd shared the best method to get high page rank backlinks so read it now.

3. Publish Some Guest Posts

As you may know that page rank mostly depends on the backlinks of a webpage and for that we need to make some quality backlinks for our blog. Guest posting is one of the most famous, proper and effective way which gives several benefits. If we look for quality backlinks then guest posting is perfect for us. You should try to publish several guest posts on high page rank blogs. Before giving guest post to any blog, you should check that the blog must have good page rank and other rankings like Alexa, DA, PA etc. Yeah! Guest posting will require some hard work and time. In each guest post, you'll get one or two dofollow backlinks towards your blog. If the posts are published on high page rank blogs then it'll surely help us to increase google page rank.

4. Social Bookmarking

Social bookmarking is also popular these days to boost backlinks, page rank and traffic of our blog. So you should also start bookmarking your blog posts on several social bookmarking sites. Social bookmarking sites allow you to add any blog post, web page (which may have special content) in their directory. They also approve and deny submissions with open eyes by human beings so you need to be careful while submitting blog posts. Choose such posts for submission which should be popular, unique and have great content. While doing a submission, try to make a difference between yours and social bookmarking submission post. I'm talking about Post Title, Image and Description. Once the posts are published then you'll get good high page rank backlinks which will help you to get good PR.

5. Do Regular Posting

Another tip to boost page rank is that you should do regular posting on your blog. That also depends on the content type, content length and niche of your blog that how much gap there should be between posts. But if you publish posts over very short time then there is a big benefit for you. At least you should try to publish a single post every day which is enough. With regular posting, you should also take care of content quality so don't lose content quality try to publish unique and unseen posts only. When you do regular posting, your blog readers will get to enjoy with fresh content, Google will also crawl your blog more and there is also chance of increasing google page rank.

6. Link Exchange

This is the oldest technique which still works perfect for increasing Google page rank. You can contact some bloggers who should have similar niche blog like you have and ask them to do a link exchange with you. Try to contact only those blogs which should have good PR already and also should be popular. If he/she accepts link exchange then send him/her your blog URL for implementing your blog link in his blog. Also take care of anchor text which should be related to the webpage title of that URL. If he/she has implemented your blog URL then he/she will also send his/her blog URL which you've to insert in your blog. That's called link exchange which will help you to increase backlink, getting traffic and also increasing google page rank.

7. Improve Internal Linking

This is the most easiest and best tip for increase the Google page rank of our blog. You should try to improve internal linking of your blog. That can be done by many methods. Adding related posts widget, popular posts widget, recent posts widget, proper navigation menu and linking old posts in newer posts are the most famous methods to do proper internal linking. The most important thing that you need to do always in that linking the posts of your blog with each other. If you've text content then try to find some phrases like "Increase Blog Traffic" and you've written about that topic previously then add that post link in that phrase anchor text. The more you internal link, Google will more crawl your blog posts and chances are higher of increase page rank.

8. Never Give a Try To Illegal Method

At last, I would like to suggest you to do not go any illegal method for increasing page rank. There are several illegal methods which you'll get but don't go with them. You know, Google is much clever than us these days and we should not even think of applying any illegal method. Even with that method, Google page rank will be increased but after when Google will catch you, your blog will directly be banned by Google and all the efforts go in waste. So, try to use legal methods always in blogging.

Final Words

These were some amazing tips which will help everyone to increase Google page rank and I hope this article is going to be helpful for every reader. Try to work on each tip which are provided above and then there are chances to get really high page rank. Please share your views about this in the comments and also share this with your friends. Take care till the next post and Best Of Luck Of Page Rank.

How To Add Beautiful Flat UI Buttons in Blogger

Beautiful Flat UI Buttons
As we all know that having a professional design of a blog is necessary these days as it gives several benefits. Bloggers and webmasters are trying to make their blog design better applying free or paid themes on their blogs and websites. The theme or design of a blog should be beautiful to look and have several features like easy interface for user, SEO friendly, Ad space ready, the colors should not affect on user's eye and many more. Previously, we've shared colorful Flat UI label cloud widget for blogger which was liked by many of our readers and they also applied that on their blogs but today, we're back with another Flat UI element or item for our blogs. Today, I'm going to share beautiful Flat UI buttons for blogger which I coded recently.
Recommended : How To Add Push Buttons in Blogger

Beautiful Flat UI Buttons - Review

These are Flat UI design beautiful buttons which will help you to bring awesomeness to your blog design. These buttons have different colors and sizes which will help you to use them for most appropriate situations and places. There are three sizes for these buttons which are big, medium and small. We've chosen total five Flat UI colors for these buttons which are Blue, Green, Red, Purple and Sea Green. Actually, These are not exact those colors mentioned above but we can call them above colors in common because mostly they match with each other. We've coded these buttons in such way that they will not affect on the loading speed of your blog because we've written short coding, compressed it and only used CSS3 without images. Another thing about these buttons is that they will work perfectly on all browsers because we've tweaked them for every browser. Click the below button to see it's live demo.
Flat UI Buttons Demo

How To Add Beautiful Flat UI Buttons in Blogger?

Implementing these buttons in our blog is not any difficult job but anyone can easily add them in his blog by following the simple steps given below. So, let's start the first step by installing these buttons in our blogs.

Step 1. Installation

  • Go To Blogger >> Template >> Backup Your Template
  • Click Edit HTML and Search For </head>
  • Paste The Following Code Above </head>
<!-- Flat UI Buttons By Www.BloggerYard.Com Start -->
<link href="http://fonts.googleapis.com/css?family=Open+Sans:300italic,400italic,600italic,700italic,800italic,400,300,600,700,800" rel="stylesheet" type="text/css"></link>
<style type="text/css">
.button {color:white!important; font-family:open sans; margin:10px 10px 10px 0;text-decoration:none!important; font-weight:700;border-radius:5px;-webkit-border-radius:5px;-moz-border-radius:5px;-ms-border-radius:5px;-oborder-radius:5px; transition:all .4s;-webkit-transition:all .4s;-moz-transition:all .4s;-ms-transition:all .4s;-o-transition:all .4s;}
.blue {background: #3498db;border-bottom: 3px solid #226693;}
.blue:hover {background:#2980b9;}
.green {background: #2ecc71;border-bottom: 3px solid #1F8C4C;}
.green:hover {background: #27ae60;}
.red {background: #e74c3c;border-bottom: 3px solid #922C20;}
.red:hover {background:#c0392b;}
.purple {background: #9b59b6; border-bottom: 3px solid #74398E;}
.purple:hover {background:#8e44ad;}
.seagreen {background: #1abc9c;border-bottom: 3px solid #127F69;}
.seagreen:hover {background: #16a085;}
.big {font-size:18px; padding:15px 20px;}
.medium {font-size:15px; padding: 10px 15px;}
.small {font-size:12px; padding:8px 10px;}
</style>
<!-- Flat UI Buttons By Www.BloggerYard.Com End -->
  • Click "Save Template".
  • Installation Completed!

Step 2. Adding Flat UI Buttons in Blogger 

You can use these Flat UI buttons anywhere in your blog. For that, you just need to copy the any button code and paste it anywhere you want to use it. Below, I'm going to give you button codes and also going to show you that how can we use them in a post.
  • Go To Blogger >> Create New Post
  • Click "HTML" Tab
  • Copy and Paste Any Button Code There.
Big Size Buttons

<a class="button blue big" href="#">Blue Button</a>
<a class="button green big" href="#">Green Button</a>
<a class="button red big" href="#">Red Button</a>
<a class="button purple big" href="#">Purple Button</a>
<a class="button seagreen big" href="#">SeaGreen </a>

Medium Size Buttons

<a class="button blue medium" href="#">Blue Button</a>
<a class="button green medium" href="#">Green Button</a>
<a class="button red medium" href="#">Red Button</a>
<a class="button purple medium" href="#">Purple Button</a>
<a class="button seagreen medium" href="#">SeaGreen</a>

Small Size Buttons

<a class="button blue small" href="#">Blue Button</a>
<a class="button green small" href="#">Green Button</a>
<a class="button red small" href="#">Red Button</a>
<a class="button purple small" href="#">Purple Button</a>
<a class="button seagreen small" href="#">SeaGreen </a>
  • Replace With The Link of Button.
  • Replace Highlighted Text With The Text You Want to Show On That Button.
  • Prepare Post Content and Publish.
  • That's All. 

Final Words

These were beautiful Flat UI Buttons for Blogger which I liked to share today with you all and I hope this little effort in preparing these buttons will help everyone to stylify their blogs. Facing any problem in implementing these buttons? Feel free to ask below. Keep in touch with us for the upcoming hot dish which is being prepared in our kitchen and also share these buttons with your friends. Take Care!

How To Add Reddit Button in Blogger

Reddit Button For Blogger
For choosing the perfect theme of our blog it's important to check several things like Layout Design, Responsiveness, SEO Friendly, Ad Spaces and many more but social media buttons are also now required while choosing theme. The reason is simple, Social buttons and plugins gives more benefit to our blog traffic and I think the reason everybody knows, when we've social buttons in blogs, everyone can easily share the post on his social profiles which means our blog post is spreading on the social networks and it also helps to obtain some extra traffic. Well, we can use these social buttons of any network and mostly you might have implemented Facebook, Twitter, Google+ buttons in your blog but ever thought about adding Reddit button in your blog? So, here in this post, I'm going to show you that how you can add Reddit button in your blog and also something about Reddit.

Why To Add Reddit Button in Blogger?

Reddit is a social bookmarking network where people can submit the special content's link there and those links are stored in the categories of Reddit. Now people come there to Reddit to enjoy the special content without wasting too much time in searching about that and those who've submitted links get high traffic to their websites. You can also submit your links in Reddit but doing it manually will be difficult as compared to submission through Reddit button. It's almost easiest to submit links with Reddit button that's why you may want to add reddit button in blogger. Other than this everyone can submit your links which is even better for you to drive more and more traffic.

How To Add Reddit Button in Blogger?

There are different type of Reddit buttons like submit link button, upvote and downvote button, button with points which we can add in our Blogger blog. So first you've to choose which button you want to add in your blog. Go To Reddit Buttons page and there will be all type buttons listed there. Just select any button, copy it's code and save it in notepad. There will be "View Code" option in the right side of every button to get it's code. Once you've choosed the button and saved it's code then follow the below steps.
  • Go To Blogger >> Template >> Backup Your Template
  • Click Edit HTML >> Find For <div class='post-footer'>
  • Just Below <div class='post-footer'> Paste The Button Code Which You've saved in notepad.
  • Click "Save Template".
Congratulations! You've successfully added the reddit button in your blog. Now it will appear below every post in your blog. 

Final Words - "Happy New Year 2014"

That's how we can easily add reddit button in our blogger blog and I don't think it's difficult. It seems like the pleasing year of 2013 has gone away and we've entered into the another year 2014. Happy New Year 2014 to you all lovely friends from my side. Consider this little tutorial as a gift of new year and also share this gift with your friends. Happy Driving Traffic With Reddit!

How To Setup Feedburner Email Subscription in Blogger

Setup Feedburner Email Subscription
When someone creates a new blog, it requires some hard in initial days like building content, choosing proper blog theme, doing SEO, creating social accounts, promoting blog, setting email subscription and many more. When the time comes for email subscription, most of newbies get confused that which email service they should use for their blog as there are many free and paid feed email services and Feedburner is most popular among them. For a complete newbie, It can be little difficult to setup feedburner email subscription in his blog so here we're going to show you that how can we setup feedburner email subscription in blogger blogs.

What is Feedburner Email Subscription and Why To Do it?

Basically, Feedburner is feed email service which helps to send our blog's feed content automatically to our subscribed readers. When we've setup email subscription in our blog, when someone will subscribe to our blog through using his email then he'll receive all the blog updates straight in his inbox. Feedburner is a powerful tool which will help us to manage email subscription automatically and also sending them blog updates. There are several reasons that we should setup feedburner email subscription in our blog such as it serve the blog readers better, living in touch with our blog readers and also helps to make money through email list.
Recommended : How To Build Email Subscribers List

How To Setup Feedburner Email Subscription in Blogger?

As I already said that newbies may face problem in setting up feedburner email subscription in their blogs but this tutorial will finish your problems. We've divided the tutorial into three parts which will just help you to understand the process with ease. 

1. Create Your Blog Feed

  • Go To Feedburner
  • Login With Google Account
  • There Will Be Box Like The Image Below, Paste Your Blog URL and Click Next.
  • Tick Mark "Atom" Feed and Click Next.
  • Now Pick Up Your Feed Title, Address or Username and Click Next.
  • Now You'll See The Message That Feedburner Feed is Now Live and You've Done The First Part.
  • Let's Jump To The Second Part.

2. Enable Email Subscription 


  • Go To Feedburner
  • Open Your Feed Dashboard
  • Click on "Publicize".
  • In The Sidebar, There Will Be "Email Subscription" Option, Click it.
  • Now In The Bottom Of The Page, Click "Activate" Button.
  • So, Your Feed's Email Subscription is Now Enabled!

3. Put Subscription Form in Your Blog

  • Go To Feedburner >> Dashboard >> Publicize >> Email Subscription
  • There Will Be Box Filled With Coding.
  • Copy That All Coding in That Box.
  • Go To Blogger >> Layout >> Add a Gaget
  • Choose HTML/JavaScript
  • Paste The Copied Code in Content Box.
  • Click "Save".
  • Congratulations! You've successfully setup feedburner email subscription in your blog.
Now a subscription form will appear in your blog by which your readers can subscribe to your blog and can receive latest posts directly in their inbox. However, If you don't like that subscription form that we've made some custom feedburner email subscription forms which you can use and these are newsletter subscription widget, header subscription box and blueprint subscription widget.

Final Words

So friends thats how you can setup feedburner email subscription in your blog and I don't think you'll face any problem in understanding this process as I've put screenshots for every step and also explained that in easy words. However, if you've any issue then feel free to ask in comments and also share your views about it. Share this article to your friends, keep visiting us and take a lot of care.

How To Use Font Awesome Icons in Blogger

Font Awesome Icons For Blogger
In the Graphic and Web Design icons are such elements which gives beauty to the design. The use of icons in designs is increasing day by day as they're more profitable. About blog themes and templates, icons are also being used in them but mostly those icons are images. Some themes have low quality icons with dull icon design and colors and other themes also have high quality flat and metro design icons. Well, Have you ever thought about using icons in blogger blogs? If yes then you might get this idea to use icon images? Now, just say "No" to icon images and get started with font awesome icons.

What is Font Awesome?

Font Awesome is a brand which gives iconic font for designers to make better designs by the use of icons. That iconic font name is same "FontAwesome". In WordPress and other platform, it is common now and everyone is using this in their blogs and sites. The brilliant thing of this special font is that it doesn't use images which helps to make blog more fast while image icons take more time to load. This font contains 369 icons including Web Application Icons, Form Control Icons, Currency Icons, Text Editor Icons, Directional Icons, Brand Icons, Video Player Icons, Medical Icons and many more which are being updated in version. It's current version is 4.0.3 that is absolutely free for everyone.  

Is It Easy To Use Such Icons in Blogger?

It's extremely easy to use font awesome icons in blogger if you know basic CSS. Even I think it is more easy to use than using image icons. I recommend everyone who has blogger blog to use these icons in their blog if they want to bring awesomeness to their blog design. If you're designing templates and widgets then you can also use them to improve design. These icons are also not made with JavaScript but just font and CSS is used in them. The steps are easy, just install external CSS plugin and call icons anywhere in HTML where you want to use.

How To Use Font Awesome Icons in Blogger

1. Installation

  • Go To Blogger >> Template >> Edit HTML
  • Search For <head>
  • Below It Paste The Following Code.
<link href="//netdna.bootstrapcdn.com/font-awesome/4.0.3/css/font-awesome.css" rel="stylesheet"/>
  • Save It.
  • Successfully Installed!

2. Using Icons

  • Now the main problem is here in using icons. Let's fight with second step.
  • First of all, Open this icons list URL in browser tab. Font Awesome Icons List
  • Get any HTML element such as <a> or <div> or <li> in which you want to use icon.
  • Now put <i class='fa fa-home'></li> between the HTML element tag.
  • Didn't get it? See the example below.
<a href="URL"><i class="fa fa-home"></i>Home</a>
  • We just put <i> HTML tag in between along with calling icon class. 
  • To change the icon, Open the list and there each icon contains class name which you can replace in class"" attribute. Just remain the first fa as it is and replace another class after space.

3. Customizing Icon

  • In some cases, you may need to customize the icon.
  • Here is nothing difficult you can do it with simple CSS.
  • Just call <i> tag in CSS and customize it as you want.
  • Example, i { color:#444; font-size:25px; }
  • In the above example, You can see I've given icon color and you can handle icon size easily with font-size.
  • That's it!
That's all about using font awesome icons in blogger and I don't think it is any difficult for those who know CSS but in starting, you might face issues. Well, customization is also easy by using CSS only. I hope that icons will help you to make better designs and these icons are gorgeous. Got a problem? Ask us in comments below. Share your thoughts and also share this. Have a nice day and Happy Icons For Blogger!

How To Add Pure CSS3 Content Tabs in Blogger

CSS3 Content Tabs For Blogger
It has been always important to use pretty theme for our blog because it affects on readers. Just an example, if you've professional design some readers can love it and will visit your blog again and again or they will easily become your big fan as it shows professionalism. Well, design is not everything but the most important thing is content that you provide and yes! There should also be great way to produce content to your readers, subscribers and everyone. Hence, There are many tools in the post editor that can help you to prepare content that will be in proper way but ever thought about implementing content tabs between your posts? This is also useful idea and can do well management in setting up content on your blog. So, Today we've brought a pure CSS3 content tabs for blogger that we're going to share.

Pure CSS3 Content Tabs For Blogger

Putting content in tabs between posts is very useful as it helps to add different categories content in a single box and it also saves the space. The content tabs widget that we're sharing today looks neat clean and has a bit of Flat UI combination. It contains only sky blue color and have 4 tabs. You can put this widget in your post to serve content of different 4 categories as tabs will help you to differentiate the content. This is made with pure HTML5 and CSS3 that are most latest version of web development languages. This content tabs widget gets fixed in any post and it doesn't how long you put the content in every tabs, It will just grow more and more. It also has an effect while changing the tab that brings more beauty.

How To Add Pure CSS3 Content Tabs in Blogger?

  • Go To Blogger >> Create New Post >> HTML Tab
  • Copy The Following Code 
  • Paste It in The HTML Tab
<link href="https://googledrive.com/host/0ByNodV_m9cVLVDV1eEkyNVBITTg/" rel="stylesheet" type="text/css"/>
<div class="tabbed-view">
  <form>
    <div class="tab-container orange">
      <label class="tab-label">
        <input checked="checked" class="tab-radio" name="page" type="radio" value="page5" />
      </label>
      <br />
      <h2 class="tab">
        Tab 1 Heading
      </h2>
      <article class="tab-page" id="page5">
        Tab 1 Content Goes Here
      </article>
   
   
      <label class="tab-label">
        <input class="tab-radio" name="page" type="radio" value="page6" />
        <h2 class="tab">
          Tab 2 Heading
        </h2>
        <article class="tab-page" id="page6">
          Tab 2 Content Goes Here
        </article>
     
      </label>
   
   
      <label class="tab-label">
        <input class="tab-radio" name="page" type="radio" value="page7" />
        <h2 class="tab">
          Tab 3 Heading
        </h2>
        <article class="tab-page" id="page7">
          Tab 3 Content Goes Here
        </article>
     
      </label>
   
      <label class="tab-label">
        <input class="tab-radio" name="page" type="radio" value="page8" />
        <h2 class="tab">
         Tab 4 Heading
        </h2>
        <article class="tab-page" id="page8">
          Tab 4 Content Goes Here
        </article>
     
      </label>
   
    </div>
  </form>
</div>
  • Find The Highlighted Lines In The Above Code
  • Replace Them As Instructed
  • You'll Need To Change Tab Heading and Tab Content Of Every Tab
  • Prepare The Post
  • Publish!

Final Touches

These were the content tabs that we were about to share today and I hope they'll help you to improve the way of producing content. In some cases, it's important to use such tabs so this tutorial will surely help. Have an issue? Comment below man! Don't waste time. Take Care!

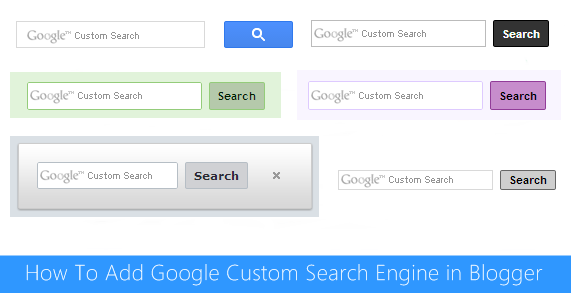
How To Add Google Custom Search Engine in Blogger

Google Custom Search Engine For Blogger
Few days ago, We had discussed that how can we add next and previous pagination buttons in blogger that actually helps to improve the user interface and user navigation of blog and today again we're going to share a widget that will also improve the navigation a bit more. Today, we're going to show you that how can we add Google custom search engine in Blogger blog. Most of the blogger templates these days comes with built-in default blogger search boxes that are not much powerful to give exact result because their factor of finding the result is not good as it should be but adding Google custom search engine will be better because it gives accurate result and also has some more useful functions.

Google Custom Search Engine? Tell me a bit more.

Just like YouTube, Blogger and Gmail Google products, custom search engine is also a product developed by Google to let sites display the search box for inner site search only. If you run a website that has tons of pages with huge data and its really difficult to set the perfect navigation than you could use search engine that will help your visitors to navigate easily just by searching the thing that they in search box and search box will automatically give them the path of the content that they want. It's totally easy. 
Do you know how Google custom search engine works? You'll be amazed by knowing it. You know how much powerful Google is and it's whole search engine. Google uses various natural factors to bring up the exact and correct search results and in custom search engine, Google uses same formula. That's why we're recommending to implement this in your blog and enjoy its facilities. 
Google custom search engine also allows you to monetize the search result pages but for that you'll need to have normally approved Google AdSense account. You can easily sign in to custom search engine with your AdSense account and enable monetization in monetize page. It might take time to activate but later it will start working. Google displays ads in the search result pages and ads are also relevant to the every keyword that user may search and you're easily paid for clicks on ads and also impressions.
Other than this, Google custom search engine has functions to customize the theme of search box, enable voice search, image search and many more options. Even you can change the layout style of search box and search results or use your own search box and display custom search engine's result somewhere else. There is a lot you can do with this. It's simply amazing.

How To Add Google Custom Search Engine in Blogger?

  • Go To Custom Search Engine 
  • Click on "Create a search engine"
  • Insert your blog URL in "Sites to search"
  • Choose Language, Pick up engine name and click "Create"
  • You'll see the message like above which means you've successfully created custom search engine.
  • Now click on "Get code"
  • Copy the code 
  • Go To Blogger >> Layout >> Add a Gadget
  • Choose "HTML/JavaScript"
  • Paste the copied code in "Content Box"
  • Save It
  • Congratulations! You've successfully added custom search engine in your blog.
There is a lot you can do now with your custom search engine like customizing the theme that may suite with your blog design, enabling monetization, disable or enable voice search and image search, changing layout and much more. Just navigation through left vertical menu bar and you can easily do all from there.

Final Words

So, That was Google custom search engine and we hope you've enjoyed today's article and if you like than don't forget adding this search box in your blog because its full of profit. Even I also removed the previous default Blogger search box and implemented this custom search now. Also share this article with your friends and Have a nice day!

How To Make Your Blogger Template Responsive

Responsive Blogger Template
About some months ago, We had published the basic guide to create blogger template which helped many of our readers to become blogger developer and it also went viral, but still its rolling there. It was basic guide and we left many things than can make you pro blogger developer and today we're back with one of the most important thing that every blogger template should have. We're gonna discuss that how can we make our blogger templates responsive. Don't know about responsiveness? Don't worry, we're here to tell you all.

What Is Responsive Web Design?

Either it is blogger template or any other web template, we can generally call it "Responsive Web Design". Let me describe in simple and common words, Responsiveness is a feature of the web theme that allows the design to fit in any screen size. In the today's technology world, people use different devices like laptop, tablet, mobile to surf the internet which have different screen sizes and our web themes must be optimized for all screen sizes to fit automatically in any device so that users may not face any issue while surfing our blog or site.
These days, almost everyone have updated their web themes to fit in every screen but some old websites and lazy designers like me don't have updated yet. Yeah! Blogger Yard is not yet responsive because we're busy right here but soon we'll introduce the totally new version of Blogger Yard which will also be responsive.
There are several reasons for making our blog themes responsive, the first and simple, it improves the user interface, it can increase tablet and mobile users and we can also generate more money with it if we display responsive ads that can appear in every screen size. 

Things To Know Before

Before we start the tutorial, let me know either you will be able to turn responsiveness in your blogger template or not. 
  1. CSS Skill : Do you have cascading style sheet skill? Yes? Great! Bringing responsiveness to blogger template is all CSS work and if you've skill in it than you might not face any issue in it.
  2. Template Structure : Do you know the structure of your blogger template? If the template is designed by you than you must know how you've wrapped the header, content and other sections. While making responsive blogger template, we play with each HTML element and for that we must know how the template is structured. If the the template is not designed by you than you can take a look on its structure and study it than you may continue making it responsive.
  3. Useful Chrome Extension : This is not the thing to be known before but we're recommending a useful chrome extension here that will help you a lot to work on responsiveness. Its Resize Window chrome extension that will help you to resize browser window with the size of different device screens. I recommend to work on every screen size that is listed in this extension.

How To Make Responsive Blogger Template?

So, Its time to learn responsiveness and we'll take a lot of time of you because we're gonna make this guide as long as we can. Let's start it.
As you know that responsive web design can be made by using CSS only and there is an special tag in CSS that we can use for responsiveness. You can use Media Queries (@media) and its just simple like drinking water if you know CSS very well. These media queries acts like If Else Statements in JavaScript and also Conditional Tags in Blogger. We make many media query tags for each and every device screen size and put CSS content in it. The CSS content that will be added in these media query tags will only work in the specified screen size. 
Its not end here friend! There is one more thing that we forget to mention. Before working with media queries, we should add a meta tag below head that helps the browser to detect the screen size and work properly with media queries.

Adding Meta Tag For Responsiveness

  1. Go To Blogger >> Template >> Backup Your Template
  2. Click Edit HTML >> Search For <head>
  3. Paste The Following Code Below It.
  4. Save!
<meta name="viewport" content="width=device-width, initial-scale=1, maximum-scale=1"/>
There is nothing much difficult with this viewport meta tag. You have to just add it below your <head> and it will start working.

Working With Media Queries 

Okay! So, I've prepared the simple media queries code with different screen sizes on which you must work.
@media screen and (max-width : 1280px) {
/* CSS FOR NETBOOK AND DESKTOP ------------*/
}

@media screen and (max-width : 1024px) {
/* CSS FOR TABLETS ------------*/
}

@media screen and (max-width : 768px) {
/* CSS FOR SMALL TABLETS ------------*/
}

@media screen and (max-width : 640px) {
/* CSS FOR IPHONE ------------*/
}

@media screen and (max-width : 480px) {
/* CSS FOR MOBILES ------------*/
}

@media screen and (max-width : 320px) {
/* CSS FOR SMALL OLD MOBILES ------------*/
}
Look, how the code is written. Its simple. Starting with (@media screen and), adding screen size (max-width:1280px) and brackets where the CSS will be stored. It simply tells the browser that if the screen size is less than max-width than apply the code in brackets. Yes! If the screen size will be exact max-width or less than it will work until it reaches to another media query. You can also change the max-width size according to your own.

Some Advanced Tips 

Tip #1 : While you're writing the code for media queries, try to specify web elements in the way we're showing you. You should use "em" instead of "px" for font-size, padding, margin etc, use percentage for defining with of columns and use box-sizing, max-width and min-width properties.
Tip #2 : Try to cover the whole design in wrapper by making div and give it different widths in every screen size or you can also do this body tag. By this, things might mess up in initial in different screen sizes but the ending corners will re-size and become responsive in other screens.
Tip #3 : Put some margin in the left and right sides of the whole body. For example if we put margin of 100px in the media screen of 768px than the design will be responsive till the 668px of screen size.
Tip #4 : While making the navigation menu, try to put label 3 lined clickable button with it for small screen sizes like mobile that shows the navigation menu after clicking on the button. If you can't do this than try to add class tags in every list item but not drop downs and hide the list items in different screen sizes where there are not suiting by calling with class.
Tip #5 : Keep doing practice with it and if you stuck than try to get help from seniors. You can also get some responsive web designs and study them to learn making blogger template responsive.

Final Keystrokes

That's how we can make responsive blogger template and we hope this complete guide won't let you face any issues but you get them, comment below and lets discuss. We're active now!